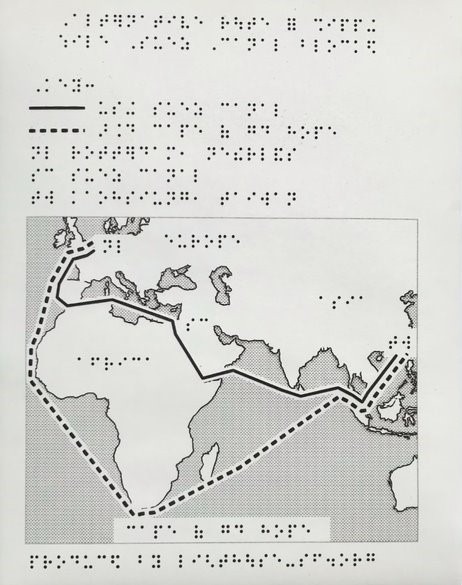
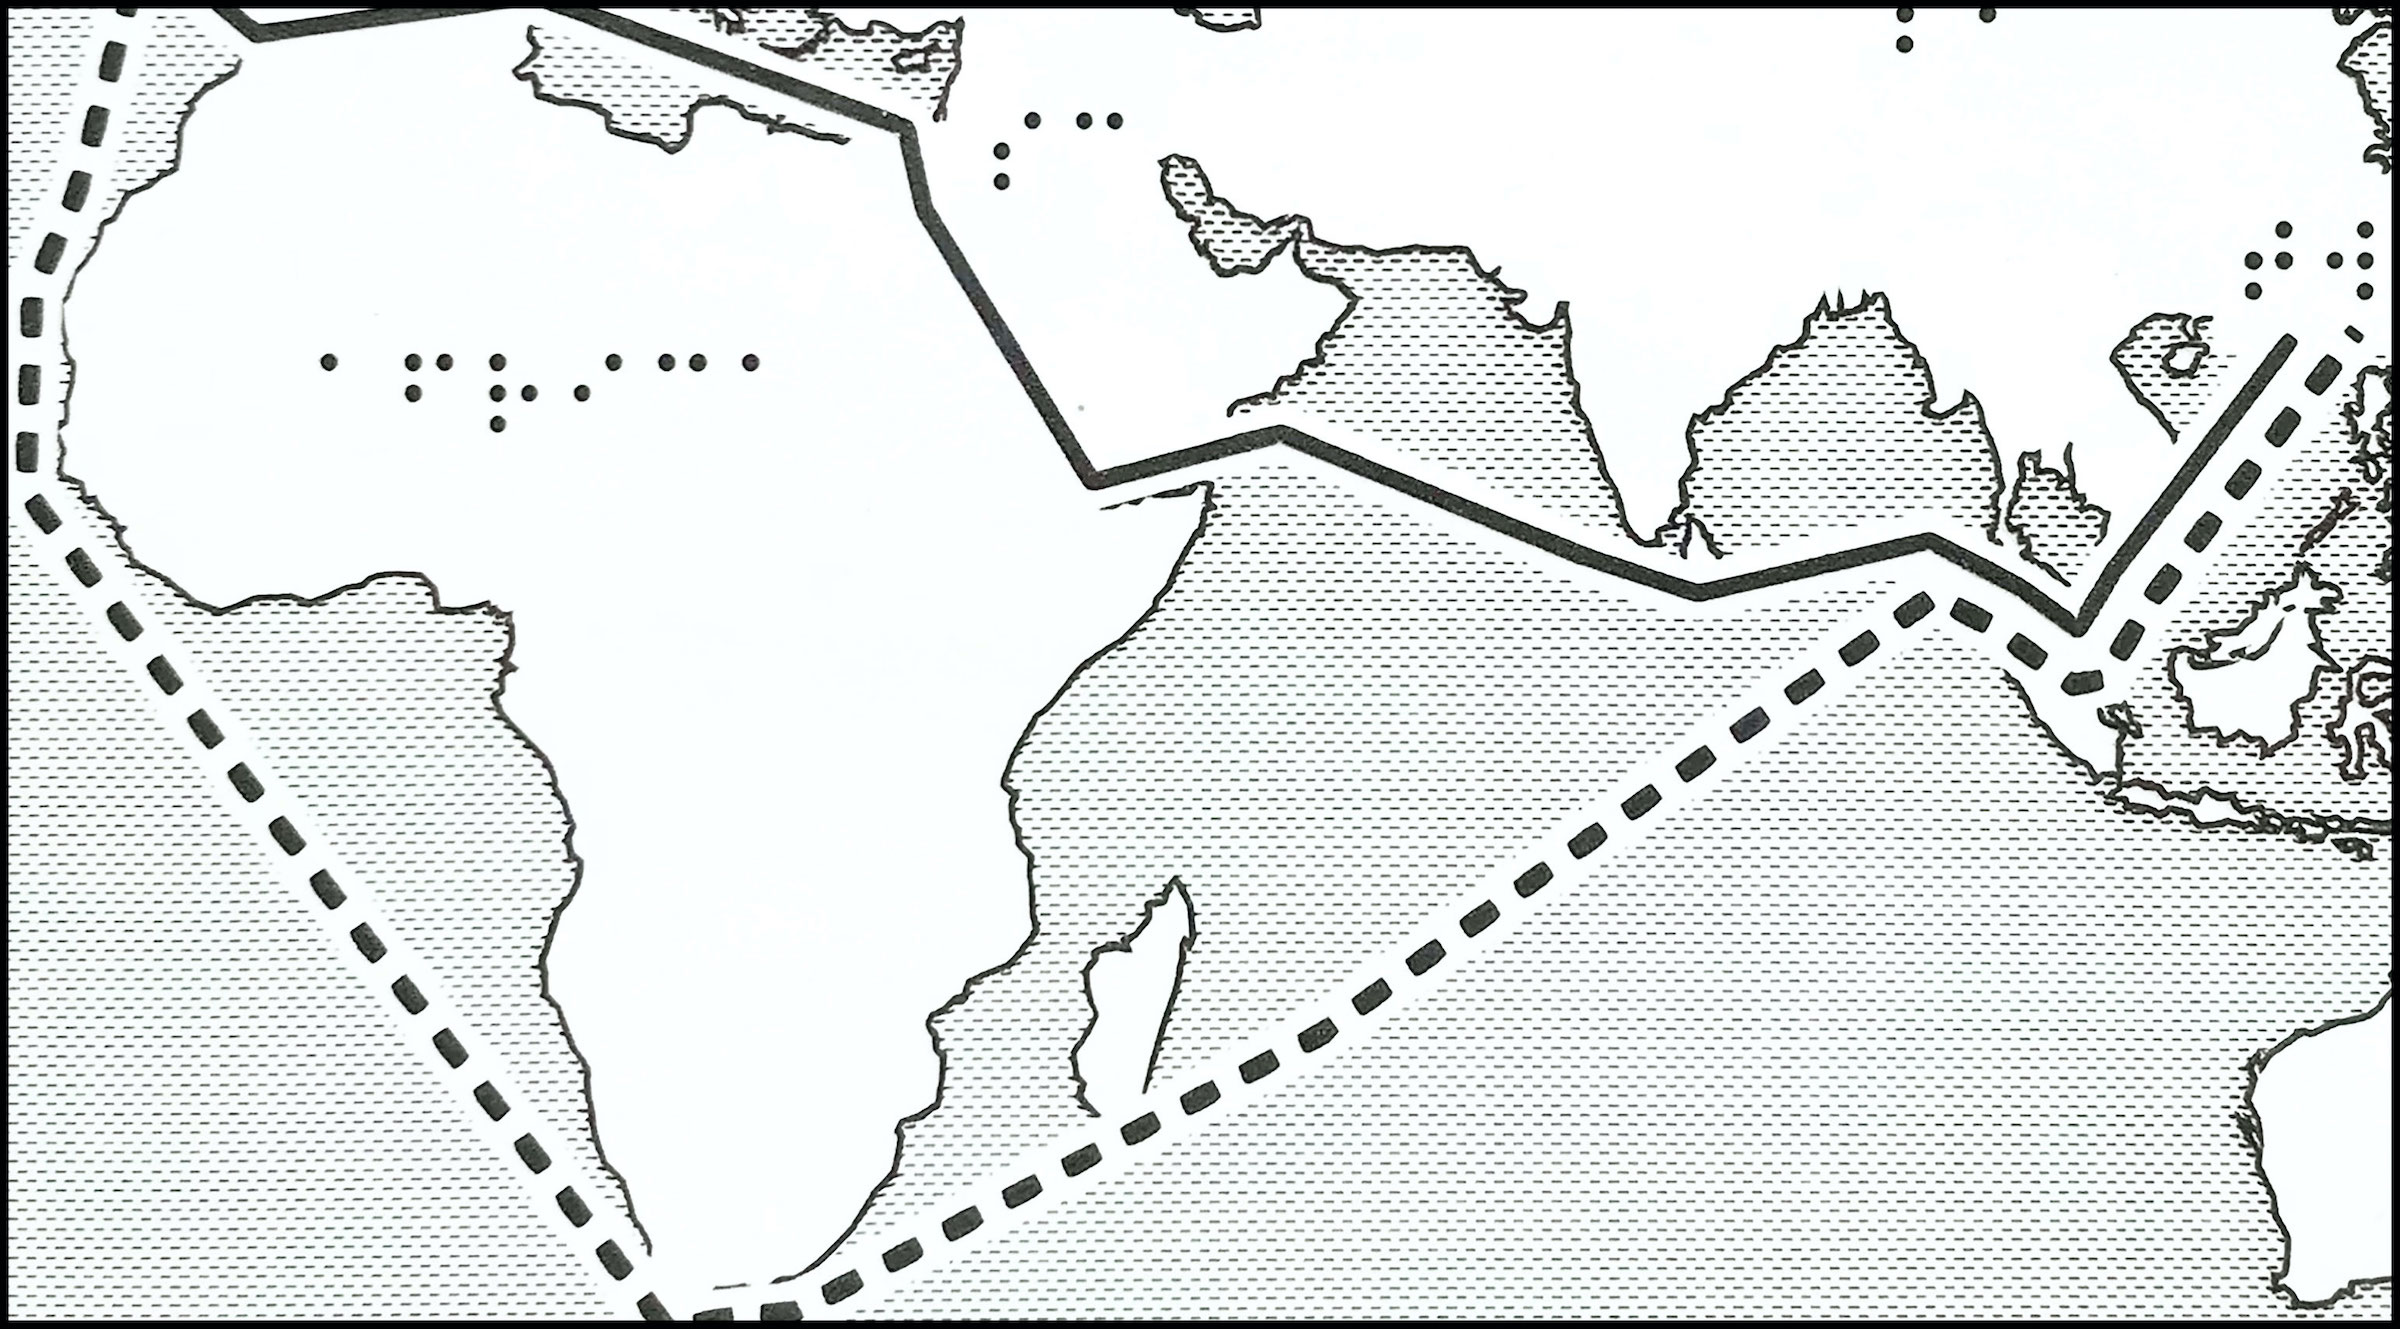
Tag Archive

MAD Lab

What does Flattening the Curve look like?

What does Flattening the Curve look like?

Flattening the curve graph, two curves increasing and decreasing along x-axis, with braille labels.

Title: Flattening the Curve.

Description: Graph with three lines, x-axis label: Time since first case, y-axis label: Daily number of cases. The first line is a tall curve labeled “Cases without protective measures,” starts at the origin with its peak high on the y-axis. The second line is a short curve labeled “Cases with protective measures,” starts at the origin, with its peak about 25% height of the first line and further to the right (more time since first case), the top just reaches the third line. The third line labeled “Capacity of the healthcare system” is straight and horizontal at the lower portion of the graph, about 25% up from the origin.

Source: Flattening the Coronavirus Curve, The New York Times,

Download Graphs

ZIP folder contains files for producing tactile graphics on 8.5 x 11-inch paper, landscape:

  • PRNs for ViewPlus Columbia / Delta, APH PixBlaster, IRIE BrailleTrac / BrailleSheet;
  • PDFs for Swell, Microcapsule or PIAF;
  • Reference PDFs with corresponding large print text (not for tactile production).

Printing Instructions and Supported Embossers

How to unzip/uncompress: Windows 10, Windows 8.1, MacOS.

Submit Your Ideas and Touch The News

Sign up

Sign up to receive tactile graphics files to print at home.

Back to Touching The News Gallery

Participants Get the Feel of Streets of San Francisco at SFMTA Sponsored Workshop

Participants Get the Feel of Streets of San Francisco at SFMTA Sponsored Workshop

On April 8, LightHouse, in partnership with the San Francisco Municipal Transportation Agency (SFMTA), held a second Tactile Intersections Workshop to promote the citywide campaign Safety—It’s Your Turn. The campaign is designed to encourage safer driving around left turns. Individuals who are blind or have low vision who live or work in San Francisco joined LightHouse Orientation & Mobility (O&M) Specialist Sarah McIntyre and Senior Accessible Media and Braille Specialist Frank Welte for the workshop where they received an overview of interpreting and comprehending tactile diagrams of various intersections found throughout San Francisco.

Upon registering for the workshop, participants were sent a packet of the tactile intersection diagrams (designed and produced in-house by LightHouse’s Media and Accessible Design Lab) to follow along from home with Sarah and Frank as they guided students through understanding what the different tactile traffic lines and symbols on each diagram represented. The two LightHouse employees made a dynamic duo as they offered valuable insights, as Sarah has the many years’ experience teaching O&M and working alongside blind and low vision people, while Frank has the first-hand knowledge and experiences of traveling in cities all over the country as a blind man.

“Understanding how various common types of intersections are configured and how traffic flows through them makes it possible for a blind traveler to cross streets efficiently and safely in a wide variety of situations.” Frank said. “The intersection diagrams produced by the LightHouse make it much easier for Orientation & Mobility students to acquire this important knowledge.”

I had the opportunity to participate in last week’s workshop. As a person who has low vision and as a non-driver, I found the workshop incredibly informative. The geography of San Francisco is unique with its many neighborhoods and busy city streets that spread out across climbing hills and flat shorelines, but while it makes for a beautiful landscape, it also makes for many complicated travel routes, both in car and on foot. Exploring the different types of intersections and gaining an understanding of what all the painted lines along the city streets actually mean helped me form and understand my own mental map of the city and specifically different busy traffic areas within my own neighborhood.

“I’ve used the intersection diagrams in two different ways,” Sarah McIntyre explained. First, with students who started learning intersection analysis and street crossing skills in person, I’ve used the intersection diagrams to reinforce and strengthen what they had begun learning.

“Second, with students who are learning spatial awareness skills and have progressed to the point of examining TMAPs [tactile street maps produced using an automated tool], I’ve used the intersection diagrams to discuss the different types of intersections found along their routes.”

Building confidence, independence and knowledge for those in the blind and low vision community is at the heart of every service LightHouse provides. It is a very empowering experience to partner with local agencies like SFMTA to help increase safety and awareness, not just for San Francisco’s blind and low vision residents and commuters, but for everyone who travels the streets of our beloved San Francisco.

If you missed out on the workshop but are interested in obtaining a copy of the Tactile Intersections Diagrams packet, you can do so by ordering the diagrams from the LightHouse store, Adaptations, by calling (888) 400-8933 or finding LightHouse for the Blind and Visually Impaired under specialized help in the Be My Eyes app. For more information about the fantastic strides the city is making to improve traffic safety visit SFMTA’s Safety—It’s Your Turn page on their website. For any inquiries about Orientation & Mobility lessons and services provided by LightHouse, contact info@lighthouse-sf.org or Esmerelda Soto at 415-694-7323.

LightHouse Introduces “Touching the News”

LightHouse Introduces “Touching the News”

Have you ever been reading a news item or watching it on TV, and thought to yourself: “I wonder what that picture is?” Ever witnessed a meme on social media go viral and want to get your hands on it to really understand what it is? As people who are blind or have low vision, we are surrounded by visual information there is no other way to experience without somebody else interpreting it for us, usually by describing it verbally. That, of course, is great. We love and appreciate the thought and effort that goes in to doing that. But what if you were delivered, into your mailbox, a tactile graphic associated with a news story. So you could then emboss it yourself, or have it raised on swell paper?

That very thing will be coming to you in the next couple of weeks. You will also get the opportunity to choose from a list of proposed graphics each time, and the one with the most votes will be the one produced that week.

You might find yourself thinking: “I wish I could get my hands on one of those Oscar statues”, well, now you just might, even without being at the Academy Awards. Space travel might be your obsession and you’re itching to know what the helicopter is like that recently took off from and landed on Mars.

There will be more in the coming days but if you are interested in subscribing to this new free service, send an email to ttn@lighthouse-sf.org.

Get In-Touch with MAD Lab’s Tactile Intersection Crossings and Attend a Workshop, April 8

Get In-Touch with MAD Lab’s Tactile Intersection Crossings and Attend a Workshop, April 8

By Kathy Abrahamson, Director of Rehabilitation Services
 
We’re pleased to announce that we received a Safety – It’s Your Turn community grant from the San Francisco Municipal Transportation Agency (SFMTA) to support safer left turn education and encourage walking and biking, especially for San Franciscans who are blind or have low vision. Part of the outreach for the Safety – It’s Your Turn education campaign is to raise awareness of the new “left turn calming” intersections designed to slow drivers as they make left turns on the streets of San Francisco. These newly designed intersections use small speed bumps and vertical barriers to encourage drivers to slow down, square their left turns, and watch for people in the crosswalk. Currently there are seven such intersections in San Francisco. 
 
For this project, LightHouse Orientation and Mobility Specialist, Sarah McIntyre and the talented designers of Lighthouse’s Media and Accessible Design Lab have developed a tactile diagram of this new “left turn traffic calming intersection as well as a book of 13 detailed tactile diagrams of intersection types that may be found around San Francisco’s streets. Both of these tactile references are being made available to blind and low vision San Franciscans at no charge to the first sixty who contact the LightHouse with interest of obtaining a copy, and, participating in an informational workshop about these resources. 
 
The Tactile Diagram Workshop will be held Thursday, April 8 from 3:00 – 4:30 pm via Zoom. Invitation is open to those San Franciscans who have received a book of diagrams. The workshop will provide an overview of the intersections and basic information in how to use and read the diagrams. Each book provides information in both braille and large print. An electronic version of the text information from the book can be provided upon request. San Francisco Unified Orientation and Mobility Specialists are encouraged to ensure a copy for their students for supplemental training and support.
 
The goal of the project is to provide overall knowledge of the availability of tactile maps so that travelers who are blind or have low vision have the best understanding of their city streets and we graciously thank the SFMTA for the ability to produce the books for our San Francisco blind and low vision community. If you are a San Franciscan who is blind or has low vision and would like one copy of the LightHouse Tactile Intersection Book, along with the supplemental traffic calming intersection diagram, please email Briana Kusuma, LightHouse Program Associate at BKusuma@lighthouse-sf.org. Briana will send one copy (per person/household) via Free Matter for the Blind and sign you up for participation in the April 8 Tactile Diagram Workshop. For those persons who would like to purchase a copy of this book, please visit Adaptations, the LightHouse Store online, email adaptations@lighthouse-sf.org or call 1-888-400-8933.
 
For more information about the Safety – It’s Your Turn campaign visit VisionZeroSF.org/leftturns.

Park Yourself in Front of a LightHouse Media and Accessible Design Lab Display

Park Yourself in Front of a LightHouse Media and Accessible Design Lab Display

LightHouse’s Media and Accessible Design Laboratory (MAD Lab) is a one-of-a-kind department that specializes in making visual information accessible to the blind. They aren’t just a team of braille transcribers, but a team of creative and highly skilled tactile designers. They can convey visual directional information into tactile maps accessible for those who are blind or have low vision, they can recreate famous works of art into touchable masterpieces, and, of course, they can turn any bit of literary information into braille or audio files so that no individual who is blind or has low vision goes without the same access to information as sighted people. That is what MAD Lab does—they bridge the gap between the blind and sighted communities.
 
In the past several years, MAD Lab has become known for their tactile mapping abilities and in-house designed and produced accessible tactile graphics. They’ve taken on projects big and small, with enormous clients of the famous cartoon mouse and iconic fruit variety, to smaller local projects for neighborhood businesses. Every new project is a challenge and an opportunity to grow and perfect their art because it truly is art, of accessibility equality and inclusion.
 
They have recently been creating accessible trail booklets, informational guides, topographical outdoor exhibits, and accessible signage for parks.
 
At the Fremont Indian State Park, MAD Lab collaborated with park services sign makers and personnel to create a topical map and tactile informational outdoor exhibition plaques that provide tactile graphics of the sign’s visual images and mapping, and braille transcription of the sign’s text. Not only is the exhibition completely accessible to those who are blind or have low vision, but the sign is also created to withstand the wear and tear of the elements.
 
A close-up of one of the tactile models After the installation of the MAD Lab’s tactile creation at Fremont Indian State Park, visitors from all over gushed over the new accessible addition to the beautiful park.  Facebook friend of Fremont Indian State Park, Christine C., posted to the park’s Facebook page, “My son has a vision impairment and he really appreciated this sign!” Another friend of the park, Teacher of the Blind and Visually Impaired, Dawn K., raved “As a teacher of the blind I was thrilled to see this when I visited the park this summer. Thank you!”
 
Community members and park guests weren’t the only ones to acknowledge and appreciate the addition of the accessible sign. The Fremont Indian State Park display was awarded first place in the Outdoor Exhibit category of the 2020 NAI Interpretive Media Competition for the collaborative work between MAD Lab and Fremont Indian Park representatives. The competition promotes excellence in the creation and production of natural, cultural, and historical nonpersonal interpretive services and annually draws in hundreds of prestigious designers, artists, and sculptors nationwide. MAD Lab is honored to see the recognition of their hard work and accessible design creations.
 
The recognition of MAD Lab’s unparalleled abilities to create and produce accessible tactile art and information has fueled the fire of passion in the department’s drive. You can see some of MAD Lab’s fantastic work installations and tactile maps and informational guides when you visit Fort Mason and Marin Headlands in the San Francisco Bay Area.
 
Learn more about MAD Lab’s tactile images, maps, and touch Installations. If you oversee a park, cultural institution or public space and would like to provide access to all of its visitors, please contact madlab@lighthouse-sf.org for a consultation and price quote.

TMAP Printing Instructions

When you download your TMAP, you will find a ZIP file with a PDF and 4 (or more) SVG files. The SVG files are Tactile Map page, Print Map page, Tactile Legend page(s), Print Legend page(s). The PDF combines these SVGs to print on our embossers. TMAP files are designed to print on ViewPlus embossers, however they can also be printed on capsule paper (or Swell, PIAF, Zychem), or on Index. Results may vary.

TMAP files are intended for 2-in-1 printing, creating an embossed and ink-print document on a ViewPlus (or Tiger) embosser. ViewPlus embossers may incorrectly print braille from PDFs. To mitigate possible braille errors, complete the steps outlined below. This creates an additional PDF with fonts unembedded, filename ending with “_VP”, ready to emboss. (Please note, this step is only for embossing to ViewPlus, and is not necessary for Swell or capsule paper.)

  1. Download the PDF Unembed Fonts tool from the ViewPlus Downloads page (for Windows only).
  2. Run PDF Unembed Fonts (see sections below: with a mouse or in command line)
  3. Open the PDF with _VP in Adobe Acrobat or Reader. Send to printer. In print settings:
    • Check the Tiger tab to optimize results. Printing “draft” quality is not recommended. On ViewPlus Columbia/Delta or APH PixBlaster, Graphics Quality: Best.
    • Check that the paper size matches your TMAP file paper size.
    • Check that the paper orientation matches your embosser output.
  4. Important! If printing tactile-only (NOT using 2-in-1 printing), send odd-numbered pages only (1, 3, etc.).
  5. Print.

Running PDF Unembed Fonts with a Mouse

  1. Create a shortcut to the Unembed program on your desktop.
  2. Drag the PDF on top of the Unembed shortcut icon or browse to the file from the Unembed Fonts tool. This will create a new file with _VP at the end in the original folder.

Running PDFUnembedfonts in Command Line

  1. To ensure the shortest file path, after extracting it is recommended to copy the entire PDFUnembedFonts folder to the root of your C drive (or an external drive). For economy of file path it is further recommended that the PDF also reside in this folder.
  2. From the start menu, Search programs and files, type cmd. Hit Enter.
  3. To point it to the specific directory type cd space c:\pdfunembedfonts
  4. Now to actually run the script on your PDF type pdfunembedfonts space .\filename.pdf. Hit Enter.
  5. If all went well c:\pdfunembedfonts should now contain a version of your PDF, the file name appended with _VP

Though TMAP file can be printed on capsule paper, the braille font is not optimized for this method, and results may vary.

  1. Open the PDF (Adobe recommended). Send to printer. In print settings:
    • Check that the paper size matches your TMAP file paper size.
    • Check that the paper orientation matches your printer output.
    • Print at 100% or Actual Size. Do not “fit” or “shrink to fit”.
  2. Choose braille or large print map:
    • For a map with braille text, send odd-numbered pages only (1, 3, etc.).
    • For a map with large print text, send even-numbered pages only (2, 4, etc.).
  3. Print.

Related Pages: TMAP Main page, Frequently Asked Questions, How to Use TMAP to Make Maps, Reading Tactile Maps, Learn more about TMAP

How to Make a Map Using TMAP

TMAP generates files of tactile street maps, which can be printed with an embosser or on microcapsule paper (either with a PIAF or Swell machine).

TMAP is optimized for Chrome, Firefox, and Safari.

Overview

Steps to producing a tactile street map:

  1. Search an address, intersection, or landmark.
    • If search results are ambiguous, choose between several options or search again.
  2. Create the map. Confirm the map address and choose map settings and features.
  3. Download or email the map file.
  4. Emboss or print the map using a ViewPlus (also called Tiger) embosser or Swellform machine, PIAF, Microcapsule paper. Printing Instructions. Or you can contact Adaptations to print and ship the map.

Step by Step Instructions

1. Search Page, where you search for an address

Starting on the Search Page where it says “Welcome to TMAP”, enter an address, landmark, or intersection into the search bar. This search uses Google maps information, so if Google maps recognizes your search query, TMAP will too. This means you can enter names like “Civic Center BART Station”. You can also enter an address, city, and state, omitting the zip code. You can also enter a street address and zip code only, without city or state. Click the Search button.

2. Map Preview Page, where you create a map

You should find yourself on a map preview page showing the address, features and settings options, and a visual map preview. If you do not get the result you were hoping for, search for a new address from the search bar or click on the TMAP logo to go back to the main search page.

2a. Map Preview Page: confirm map address

Check that your map is of the correct location. After the search bar reads “Create map for” followed by the address TMAP found from your search. Is this address correct?

If this address is not what you expected or does not match the address you think you searched, check spelling or try omitting apartment numbers. If you enter an address that Google is unsure of, or is ambiguous, like “Main Street”, TMAP will give you a list of options, showing you a preview of maps of various Main Streets in different cities. Select one of the options, if any are correct, or add city name or zip code for better results.

If you want to make a map of this address, you can continue on to choose settings and add features to your map.

2b. Map Preview Page: settings

Once you have confirmed the map address, choose your preferred paper size, map scale, and distance units.

  • Paper size depends on your printer or embosser, and amount of information you want to show on the page.
  • Map scale is how zoomed in or out you want to be, how much information you want to show on the page, or how dense you want the map to be.
  • Distance units is feet or meters.
  • The default settings are 11.5 x 11-inch paper (standard braille paper size), 1:5000 scale (or about ¼ mile on braille paper), and miles.

2c. Map Preview Page: features

Now comes the fun part where you get to add features to the map. You have the option to include streets, paths, service roads, and railways. (Buildings are currently unavailable, but will be back soon.) We have tried to match the look and content of the map preview to the TMAP output, but occasionally you will notice differences, especially around railways that go underground. Some things to know about features:

  • By default, streets are checked.
  • Checking or unchecking these buttons will not change the map preview.
  • On the map preview, the thicker solid lines are streets, thinner solid lines are service roads, dotted red lines are paths, and dashed lines are railways.
  • All of the data we use to generate map is from OpenStreetMap, an editable, opensource map of the world created by volunteer mapmakers. If someone has not yet mapped the path by your house, it will not show up on TMAP. If you notice something important missing (like your favorite walking trail), please contact us and we will try to add it in to OpenStreetMap.
  • We do not recommend checking all the boxes for every map. Though this may be tempting, it will create a very cluttered and potentially illegible reading experience.
  • For zoomed in map, it’s ok to include paths, service roads, and railways.
  • Service roads are things like alleys, bus lanes, and main routes through parking lots (we have omitted smaller parking lot aisles to eliminate clutter). If these are significant to the reading of your map, then include them. If not, it’s best to omit them.
  • We recommend caution when selecting railways and paths on maps covering large areas since they can blend in and overlap too much with streets, but the density of your map varies based on location, so experiment and play around with it.

2d. Map Preview: pan

By default, the address you searched is in the center of the map preview box. If using a mouse, you can pan to the area you want to print by clicking, holding, and moving any part of the map. If you drag your address outside of the map preview, the center locator dot will no longer appear on your printed map, though the map will still be titled with your searched address.

2e. Map Preview: zoom

If you change map scale from the dropdown above the map, the preview automatically zooms in or out. You can also click on the plus and minus buttons at the top right corner of the map preview.

2f. Create Map

Once you have chosen a paper size, map scale, distance units, and map features, click the Create Map button. This will bring you to the File Preview page where you can download or email the map file.

3. File Preview and Download

On the File Preview and Download page, you have another chance to confirm your map choices. This page reads “Download map for” and lists the address TMAP found from your search. There is also a visual preview of the generated file, showing the print version of the map with streets, street name abbreviations, and any features you selected that appear on the map.

If you aren’t happy with the file preview, you can navigate back to the previous page to edit your selections. If you click the back button on your browser, all settings except map features will be saved (except on Safari, you lucky mapmaker).

If you are happy with the file preview, you can click Download or Email. Emailing the file simply sends the TMAP files to the email address you’ve entered. It will come from tmaps@lighthouse-sf.info When you download your TMAP, you will find a ZIP file containing a PDF and 4 (or more) SVG files. The SVG files are Tactile Map page, Print Map page, Tactile Legend page(s), Print Legend page(s). The PDF combines these SVGs to print on our embossers.

4. Print or Emboss

Now print your map! See Printing Instructions

Having trouble? Check our Frequently Asked Questions or contact us. Check out our recent presentation (demonstration at 17:55).

Order TMAPs from Adaptations.org

Related Pages: TMAP main pageHow to Use TMAP to Make Maps, Reading Tactile Maps, Download Introduction to TMAP page, Learn more about TMAP

About TMAP

How can someone without eyesight learn a city block or navigate a new neighborhood? In 2018, the LightHouse of the Blind and Visually Impaired – SF introduced TMAP: Tactile Maps Automated Production, offering on-demand tactile street maps.

Covering an area of several blocks surrounding a given address, TMAP uses both braille and large print to identify streets, represented by crisp, raised lines that can be easily followed with the fingertips.

TMAP is a collaboration of the LightHouse for the Blind and Visually Impaired, and the Smith-Kettlewell Eye Research Institute.

Side by side key and tactile map of 1155 Market Street showing braille and print text, tactile and ink street lines.
TMAP of the LightHouse Building location in San Francisco, CA.

Order a map for $26.25

To order a map, call our product specialists at 1-888-400-8933 or or visit adaptations.org and specify the street address of the map you’re interested in receiving. Within two business days we’ll ship you your map.

What’s in the package?

  • You will receive two maps of the same address, a zoomed-out overview map, and a zoomed-in detail map showing streets, paths, and buildings, if the data is available
  • A tactile map key
  • An introductory page (download intro page)
  • All materials are printed on 11” X 11.5” sheets of embossed paper and include ink / large print labels in addition to braille

Learn more about the MAD Lab where these maps are produced.

Contact

Recent Presentations: At Home With APH: TMAP – Building Environmental Literacy at a DistanceMobility Matters 2020 Slides, Mobility Matters 2020 Video Presentation

Related Blog Posts: Maps, at your Fingertips, New local tactile maps at Adaptations

Love maps? Sign up for our newsletter!


Maps for the blind: How the MAD Lab is challenging designers’ hyper-visual assumptions

Maps for the blind: How the MAD Lab is challenging designers’ hyper-visual assumptions

For the experienced blind traveler, obstacle avoidance is not the overwhelming part—that’s why we have canes, dog guide and blindness skills. The challenging part is getting familiar with the lay of the land in order to make the spontaneous choices of everyday life, like which quirky cafe to duck into or how to get to the canal everyone keeps telling you to wander along.

And if you’re a sighted traveler, it’s easy to take mapping tools for granted with GPS apps at your fingers. Most people don’t realize that blind people don’t have easy access to non-visual or ‘tactile’ maps. (You might be asking: what’s a tactile map? It’s pretty simple—it’s a map with raised lines and braille markers that you can feel.)

That’s why the LightHouse Media and Accessible Design Lab hosted a Maptime SF/Oakland meetup last month: to teach multidisciplinary designers about accessible methods to use when creating maps and encourage them to incorporate tactile information into their work.

Attendees came from a wide swath of industries and design disciplines. The MAD Lab team hosted designers from Apple, architects from Arup, graphic designers, transportation specialists, programmers, students in interactive design, occupational therapists, special ed teachers, ocean mapping specialists, and highly skilled cartographers.

After comparing and contrasting examples of different design methods and discussing their effectiveness, Maptimers used these precepts to make their own maps. The group also discussed Tactile Maps Automated Production, and how this automated mapping system is a game changer for tactile map production.

“There’s such a lack of tactile graphics in the world,” says MAD Lab Senior Designer Naomi Rosenberg. “The only way to increase tactile graphic production is to teach more people how to incorporate tactile information into their designs. Sharing our expertise in tactile graphics empowers specialists in other fields to step outside of their normal design process, and design better for their audience and underrepresented audiences.”

Photos from the workshop

Take a little tour of their design process below. And if you’re sighted, next time you walk down the street or hop on Google maps, start to consider the lack of non-visual information that is available to tell you how to get around. If you’re a designer, it might just change how you approach your own designs.

Workshops like this support the MAD Lab’s goal of making visual information accessible to people who are blind and visually impaired. Ready to get your hands on your own tactile map? We can quickly create an inexpensive personalized map for you centered on a square mile anywhere in the US – visit or call the Adaptations Store to order! Stop by  at 1155 Market St. or give our specialists a call at 1-888-400-8933.

Braille Mail: Get Your Tactile V-Day Cards at the Adaptations Store

Braille Mail: Get Your Tactile V-Day Cards at the Adaptations Store

This Valentine’s Day, give your loved one real feels with our new line of fun, touchable greeting cards. Our Adaptations Store is offering three designs, each with ink-print, tactile and braille designs on a white background.

  • Individual cards are $6, or you can purchase four for $20.
  • All cards come with an envelope.
  • All front covers of the greeting cards feature a combination of ink print and tactile graphic design.
  • The Adaptations Store and the MAD Lab will continue working together to design fun and creative accessible greeting cards that appeal to a wide audience, for all occasions.
  • We will roll out cards all-year-round. Keep posted for birthday, thank you, Mother’s Day, and Father’s Day!
  • If you have suggestions for types of cards to sell for upcoming holidays, please email adaptations@lighthouse-sf.org.
A white greeting card features a 4 X 3 grid of ink-print and braille patterned and multicolored hearts.
A white greeting card features a 4 X 3 grid of ink-print and braille patterned and multicolored hearts. The inside of the card reads “Happy Valentine’s Day!” in red large-print and braille.
The inside of the card reads "Happy Valentine's Day!" in red large-print and braille.
An ink-print and tactile graphic of a tic-tac-toe board with a heart in the center, on a white greeting card. The inside of the card reads “Happy Valentine’s Day!” in red large-print and braille.
Red ink-print and braille X's and O's form the shape of one large heart on a white greeting card. The inside of the card is blank.
Red ink-print and braille X’s and O’s form the shape of one large heart on a white greeting card. The inside of the card is blank.
The inside of the card reads "Happy Valentine's Day!" in red large-print and braille.
The inside of the card reads “Happy Valentine’s Day!” in red large-print and braille.


Adaptations is the only place in Northern California with a comprehensive offering of tools, technology, and other solutions for blind and visually impaired people. The store is located at our San Francisco headquarters at 1155 Market Street, on the 10th floor. Store hours are Monday through Friday, from 10:00 a.m. to 5:00 p.m. We are also open on the second Saturday of each month from 10 a.m. – 2 p.m. Although we do not take online orders at the current time, we encourage you to call our staff at 1-888-400-8933 to inquire about item pick up or mail orders or email our store staff at adaptations@lighthouse-sf.org.